

Preventing and Treating Split Ends: A 3-part series. Part 2
Written by Julane Falknor
Let’s keep this momentum going, Sis! We’ve built the foundation and understood the "why," but now we have to get into the nitty-gritty. This is the part where most of us get a little nervous: scissors. Take a deep breath, grab your tea, and let’s talk about the "surgery" your crown might need to flourish.
Section 4: The Art of the Cut – Dusting vs. Trimming
I know, I know. For many of us, the word "trim" sounds a lot like "let's cut off four inches of your hard-earned progress." The fear is real! We’ve all had that experience where we asked for a "dusting" and walked out of the salon feeling like we just got a bob.
But here is the hard truth from your bestie: Holding onto dead ends is holding back your growth. Think of a split end like a snag in a pair of luxury silk stockings. If you don't address that tiny snag immediately, it’s going to run all the way up the leg. Hair works the same way. A split starts at the bottom, but if left alone, it travels up the hair shaft, weakening the entire strand

until it snaps off high up. That’s why some people feel like their hair "stops growing" at a certain point. It’s still growing from the root, but it’s breaking off at the bottom just as fast!
1. The "Search and Destroy" (S&D) Method
If you aren't ready for a full-on salon trim, let me introduce you to your new best friend: Search and Destroy. This is a targeted mission.
The Goal: To remove individual split ends without touching your overall length.
The Process: Sit in a well-lit area (sunlight is best) with a pair of professional hair shears. Look through small sections of your hair. When you see a split or a single-strand knot, snip it about a quarter-inch above the damage.
The Vibe: It’s actually quite therapeutic! Put on your favorite podcast or one of our StyldLife Crown Club "Coffee & Coils" replays and just focus on your ends.
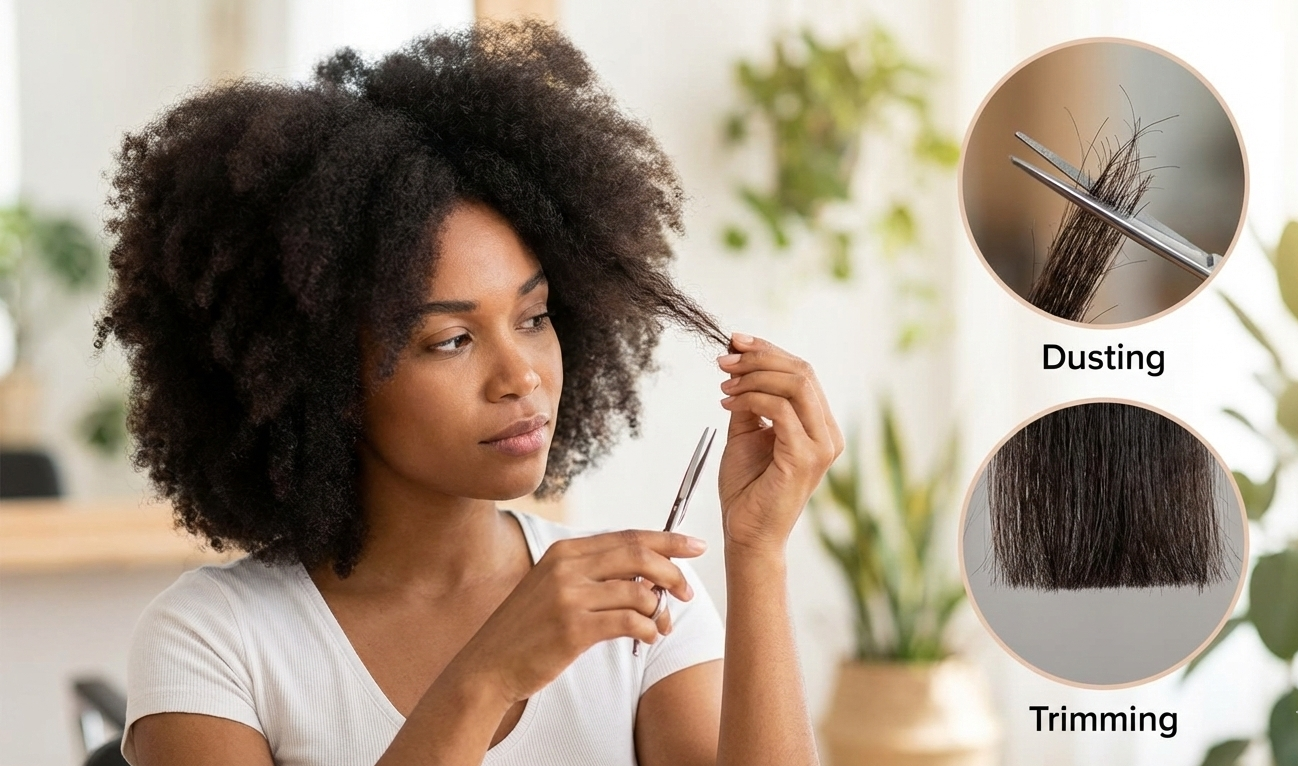
2. The Difference Between a Dusting and a Trim
Dusting: This is literally just cutting off the "frizz" at the very bottom. We’re talking 1/8th of an inch. It’s like a light exfoliation for your hair.
The Trim: This involves removing 1/2 inch to an inch to ensure the ends are blunt and healthy. If your ends feel see-through or "velcro-y" when you try to detangle, you need a trim, not a dusting.
3. The "Kitchen Scissor" Intervention
Sis, please listen to me. Put the kitchen scissors back in the drawer. Do not use the scissors you use to open Amazon packages. Paper scissors are dull; they don't slice the hair, they crush it. Crushing the hair strand actually creates new split ends instantly. Invest in a pair of stainless
steel hair shears. If you’re not sure which ones to buy, our StyldLife stylists often drop their favorite tool links in our members-only network—it makes a world of difference.
StyldLife Insight: If the thought of doing this yourself gives you anxiety, that is what we are here for! Our experts, like Erikajoy, have mastered the art of the "Curly Cut." You can actually book a consultation through the Crown Club to get professional eyes on your ends before you make a move.
Section 5: Advanced Treatment – Managing Existing Splits
"But Sis, I see a split right now! Can’t I just use a product to glue it back together?"
I wish I could tell you yes. I really do. But let's be real, once the hair fiber is split, it’s physically separated. There is no biological way to "heal" it permanently. However, we can manage it and "Band-Aid" it until your next scheduled trim.
1. The Myth of "Mending" Products
You’ll see a lot of products at the store labeled "Split End Mender" or "Repairing Sealant." These products usually contain polymers or silicones that act like a temporary glue. They coat the hair and stick the split back together so the hair looks smoother and stops snagging on other strands.
The Catch: This is temporary. As soon as you wash your hair, the "glue" is gone and the split is back.
The Strategy: Use these products to prevent further splitting until you can get to your shears. Don't rely on them as a permanent fix!
2. Deep Conditioning: The Moisture-Protein Balance
When your hair is damaged, it’s often because the protein bonds are weak or the moisture levels are non-existent.
Protein Treatments: If your hair feels mushy or overly soft but still breaks, you might need a light protein treatment to fill in the "gaps" in the hair shaft.
Moisture Drench: If your hair feels brittle and "snaps" like a dry twig, you need an intensive moisture mask.

The Secret Sauce: Focus your deep conditioner on the last 3 inches of your hair. Put a shower cap on and let the heat from your scalp help the product penetrate.
Pro-Tip from the Club: In our webinar with Yanine Williams, she talked about the "Water-First" method. If you aren't applying your deep conditioner to soaking wet hair, you're missing out on maximum absorption. Check out her "Routine Refresh" video on our network to see her step-by-step application technique—it’s a game-changer for thirsty ends.
Section 6: The StyldLife Way – Expert Routines & Styles
Now, let’s talk about how we "style" our way to health. At StyldLife Crown Club, we believe you don't have to sacrifice style for safety. You can have the most gorgeous, trend-setting look while also being the ultimate protector of your ends.
1. The "Sealant" Strategy (L.C.O. Method)
We mentioned this earlier, but let’s go deeper. To keep your ends from splitting, you have to lock the moisture in.
L (Liquid): Water or a water-based leave-in.
C (Cream): A thick, moisturizing cream to smooth the cuticle.
O (Oil): A heavy oil (like castor or jojoba) to seal it all in.
The Focus: Spend 70% of your time on the bottom 30% of your hair. Your ends are the "oldest" and need the most "insurance."
2. End-Friendly Protective Styles
We love a good look, but some "protective" styles are actually destructive if the ends are left out or stressed.
The Bubble Braid: This is a club favorite! It keeps the hair contained in sections. If you use silk or satin scrunchies for each "bubble," you're minimizing friction.
The Tucked Bun: Instead of a messy bun where the ends are exposed to the air, try a "Tucked & Pinned" bun. This keeps your ends safely hidden inside the style, away from the dry winter air.
Natural Texture Braids: In our special webinar, Tiffany Reid showed us how to do breathtaking bridal updos that actually protect the hair. You don't have to be a bride to rock these! These styles are perfect for keeping your hair "put away" for 3-5 days at a time.
3. The "Low Manipulation" Lifestyle
The more you touch your hair, the more you risk breaking it. January is the perfect time to embrace a "low-poo" and low-manipulation month. Give your hair a break from the constant combing and styling. Let it rest.

Expert Integration: Remember, if you're struggling with the technique of these styles, we’ve got you. The StyldLife Crown Club library isn't just theory; it’s practical. From Aevin Dugas teaching us how to handle massive volume without breakage to our "12 Days of Christmas" snippets, the tutorials are there to ensure your "at-home salon" experience is top-tier.
Sis, we are deep into the transformation now! We’ve mastered the prevention, the science, and the "surgery." Coming up next is the finale: Section 7, our robust "Ask Us Anything" FAQ, and our closing "January Reset" checklist to get your 2026 started right.